Excerpt from the end of the note:
In conclusion: accessing the web interface of the IP camera is possible at the address 45.96.40.14:580 from any point on the Internet. Additionally, it is possible to open several more ports (such as RTSP: 554, Onvif: 8080 - for remote recording on a video recorder) and add several more devices (for example, additional cameras).
***
Network Topology
Router Network (at the country house): 192.168.1.0/24
VPN Network (L2TP VPN server on VPS): 172.16.0.0/16
_______________________
Camera IP Address: 192.168.1.36 (considering port 80 for the web interface)
VPN Server Gateway: 172.16.0.1 (subnet mask: 255.255.0.0)
VPS Server IP Address: 45.96.40.14 (your actual IP may vary)
What you will need:
- IP Camera or DVR (or another network device).
- D-link DIR-620S or DIR-300 router (other routers may work, but not every model; the mentioned models are tested and confirmed to be suitable, with setup descriptions and screenshots in the article).
- VPS server.
***
1. Set up a VPS server and an L2TP VPN server on it.
1.1 Register a VPS on your favorite hosting provider.
For example, Beget. (yes-yes, it's a referral link, register through it, and I'll get bonuses).
The cheapest tariff plan will be sufficient. Additionally, there's no need to pay for the entire month initially; you can start by depositing $0.18, which will cover you for 2 days.
Choose Ubuntu 22.04 for installation (previous versions will work as well).
Now, use the login and password received via SMS and email for your account.
The login and password (for SSH connection) for the newly created VPS will be sent to your email in a message with the subject:
"LTD Beget: Virtual server "..." has been successfully created."
2. Connect via SSH and set up L2TP VPN.
2.1 We need an L2TP VPN server on Ubuntu, where the client is a router that routes the local network (192.168.1.0) to the L2TP server network (172.16.0.0) with a subnet mask of 255.255.0.0 and a gateway of 172.16.0.1.
sudo apt update
sudo apt install xl2tpd strongswan
2.2 Edit the file /etc/ipsec.conf to add the following configuration:
config setup
charondebug="ike 1, knl 1, cfg 0"conn %default
keyexchange=ikev1
ike=aes256-sha1-modp1024!
esp=aes256-sha1!
dpdaction=clear
dpddelay=300s
dpdtimeout=300sconn L2TP-PSK
authby=secret
auto=add
keyingtries=%forever
ikelifetime=8h
keylife=1h
ike=aes256-sha1-modp1024!
esp=aes256-sha1!
type=transport
left=%any
leftprotoport=17/1701
right=%any
rightprotoport=17/%any
rightsubnet=172.16.0.0/16
2.3 Edit the file /etc/xl2tpd/xl2tpd.conf to add the following configuration:
[global]
ipsec saref = yes[lns default]
ip range = 172.16.0.2-172.16.0.254
local ip = 172.16.0.1
refuse chap = yes
refuse pap = yes
require authentication = yes
name = l2tpd
ppp debug = yes
pppoptfile = /etc/ppp/options.xl2tpd
length bit = yes
2.4 Create the file /etc/ppp/options.xl2tpd and add the following configuration to it:
ipcp-accept-local
ipcp-accept-remote
refuse-eap
require-mschap-v2
noccp
noauth
mtu 1400
mru 1400
2.5 Add users who will be granted access to the VPN:
Edit the file /etc/ppp/chap-secrets and add the following configuration:
username1 * password1 *
username2 * password2 *
2.6 IP Packet Forwarding Configuration
Edit the file /etc/sysctl.conf to enable IP packet forwarding:
sudo nano /etc/sysctl.conf
Make sure the following line is uncommented:
net.ipv4.ip_forward=1
Примените изменения:
sudo sysctl -p
2.7 Firewall Rules Configuration
Configure firewall rules to allow traffic between the local network and the VPN. Assuming the interface connected to the internet is eth0 and the interface connected to the local network is eth1.
sudo iptables -A FORWARD -i eth0 -o eth1 -s 192.168.1.0/24 -d 172.16.0.0/16 -j ACCEPT
sudo iptables -A FORWARD -i eth1 -o eth0 -s 172.16.0.0/16 -d 192.168.1.0/24 -j ACCEPT
sudo iptables -t nat -A POSTROUTING -o eth0 -j MASQUERADE
Save the firewall rules to apply them after the server restarts:
sudo iptables-save | sudo tee /etc/iptables.rules
2.8 Autostart Configuration
Create the file /etc/rc.local:
sudo nano /etc/rc.local
Add the following lines:
iptables-restore < /etc/iptables.rules
service strongswan restart
service xl2tpd restart
Ensure that the /etc/rc.local file has execute permissions:
sudo chmod +x /etc/rc.local
2.9 Start Services and Restart the Server
Start the L2TP services and restart the server:
sudo systemctl start strongswan-starter
sudo systemctl start xl2tpd
sudo reboot
***
At this stage, you can preliminarily test the work done.
To do this, create an L2TP connection on your router.
(I recommend using D-Link DIR-620S or DIR-300 - as their functionality has been tested with this guide.)
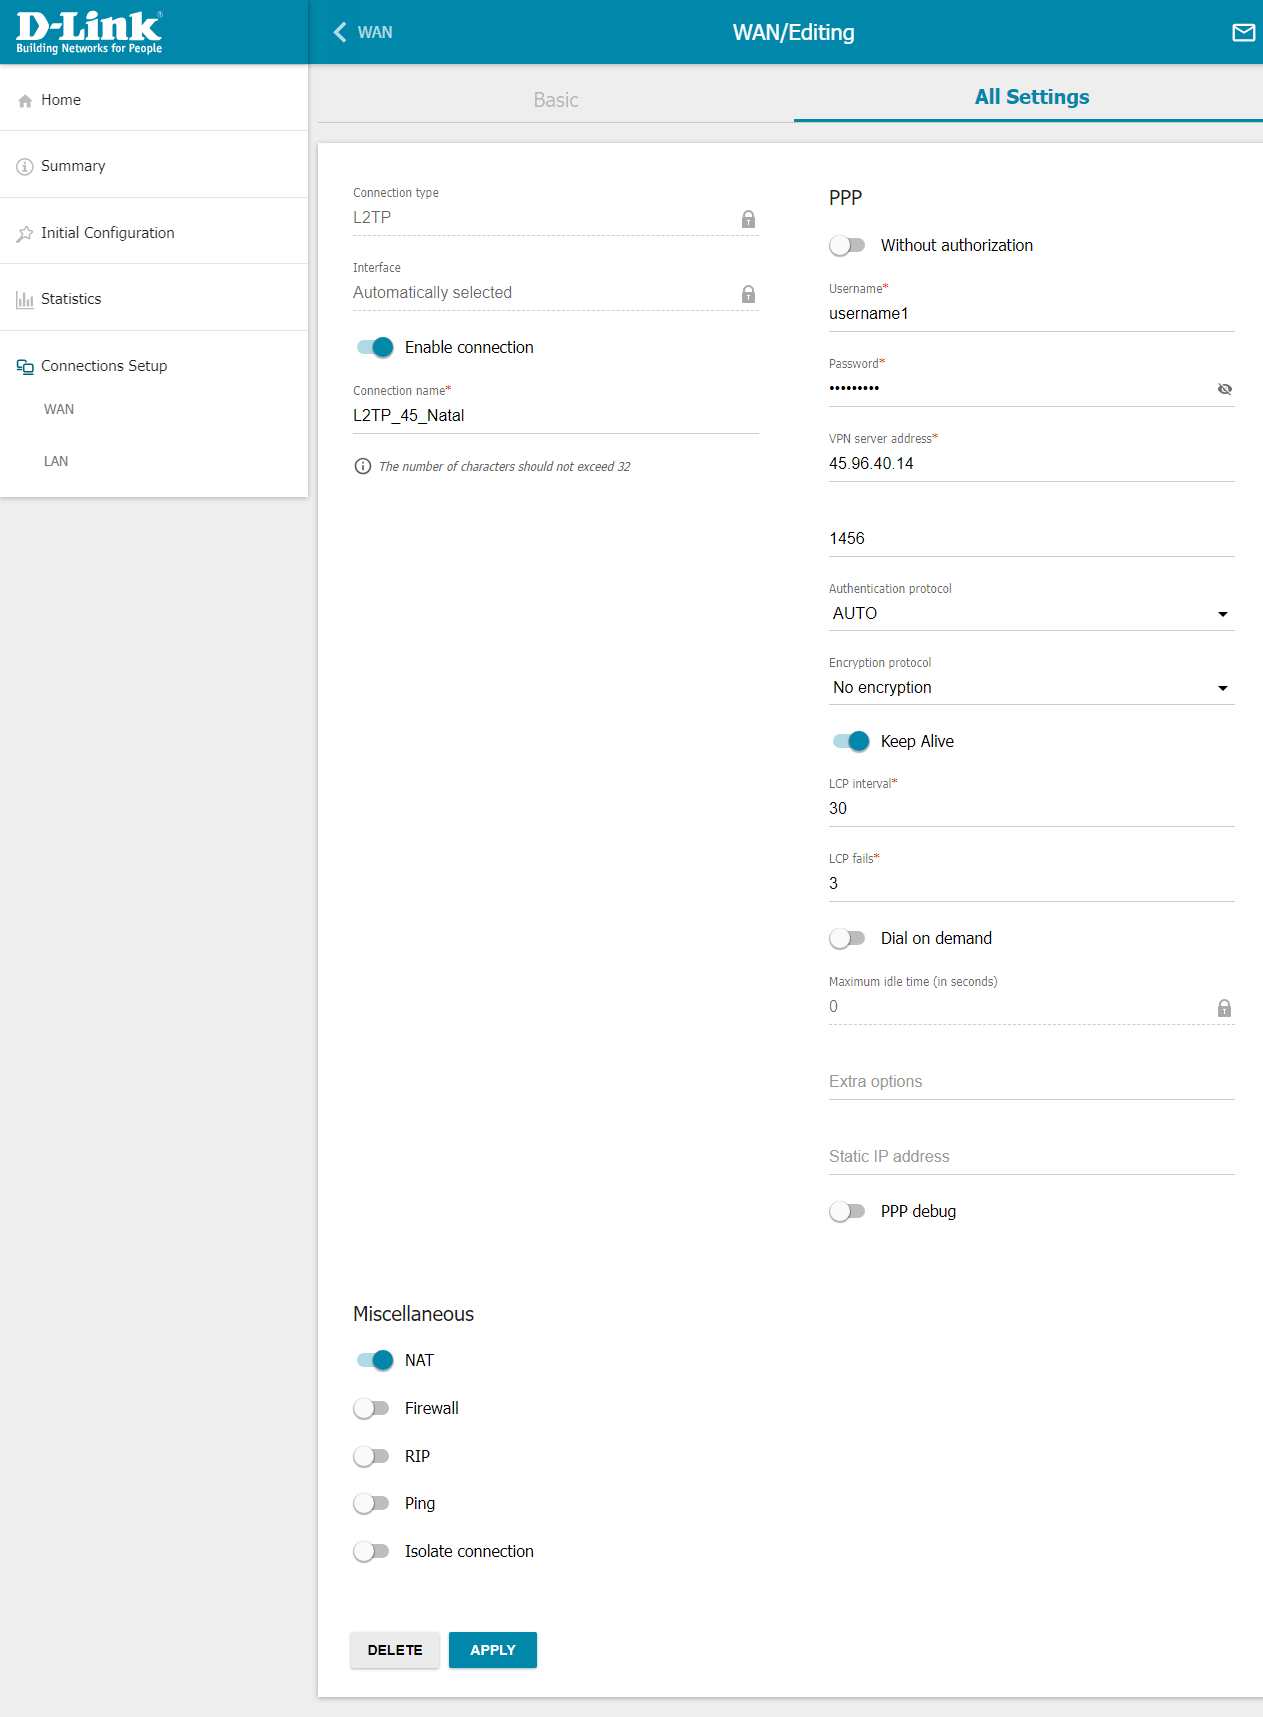
L2TP Connection Settings for DIR-300:
Navigate to Connection Setup → WAN → Click on the plus (+) sign to add a new connection.
Connection Type: L2TP
Username: username1
Password: username1
VPN Server Address: 5.35.9.70 // IP of your VPS server
{Click on the "All settings" tab for advanced settings}
NAT: Turn off
Firewall: Turn off (!) during testing
{An important note: On DIR-300, I had the option to turn off the Firewall, but on DIR-620S, this may not be possible. It's not ideal, and additional firewall configuration may be required, which will be explained and demonstrated later.}
Click Apply.
After this, the router will automatically start connecting to the L2TP server, and if successful, after a few F5 presses, you will see "Connected" in the Status column.
Next, you can ping our server from the router:
For D-Link, go to System → Ping
In the Host field: 172.16.0.1 // VPN network server address.
If you see:
3 packets transmitted, 3 packets received, 0% packet loss
Great! Let's proceed.
***
3. A few more router settings
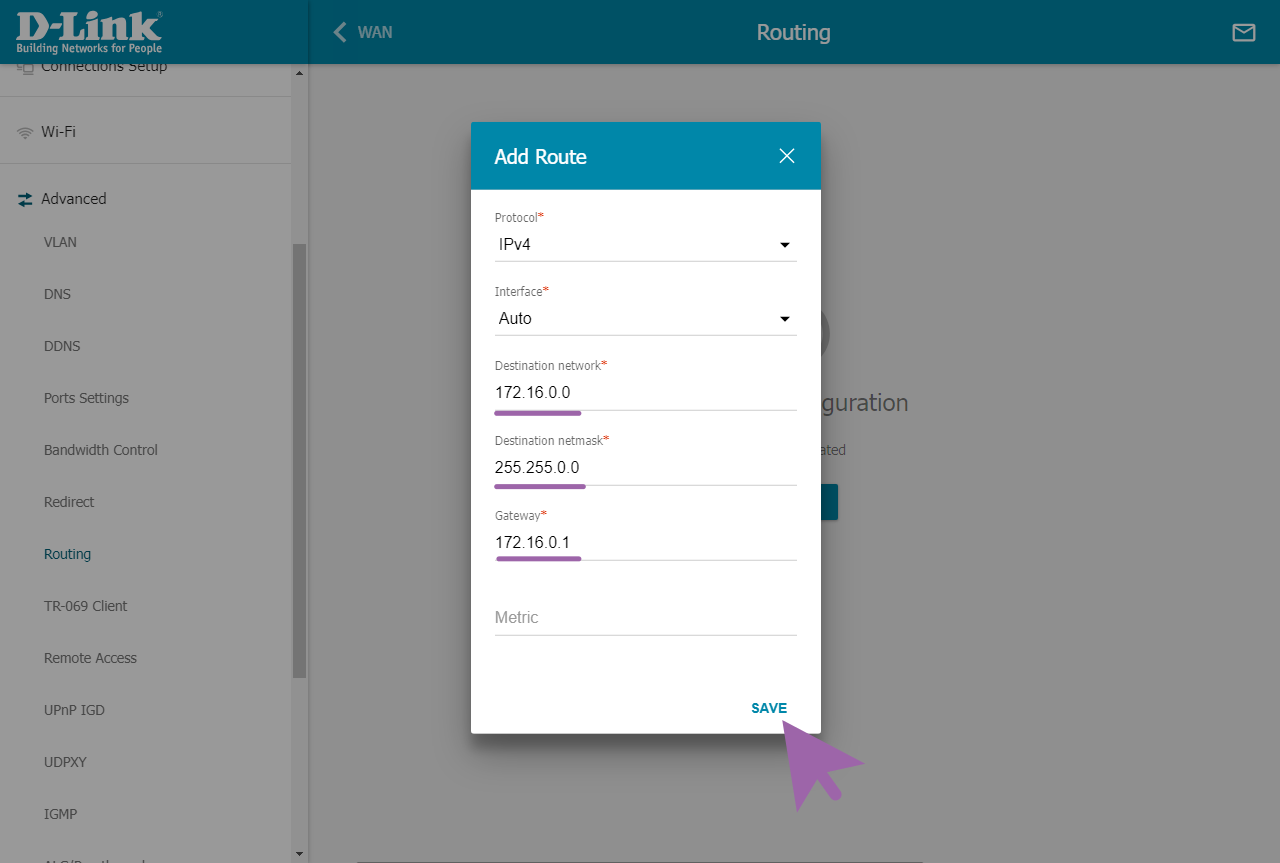
3.1 Set up the route
Advanced → Routing
Add a route to the network 172.16.0.0 with a subnet mask of 255.255.0.0 and a gateway of 172.16.0.1
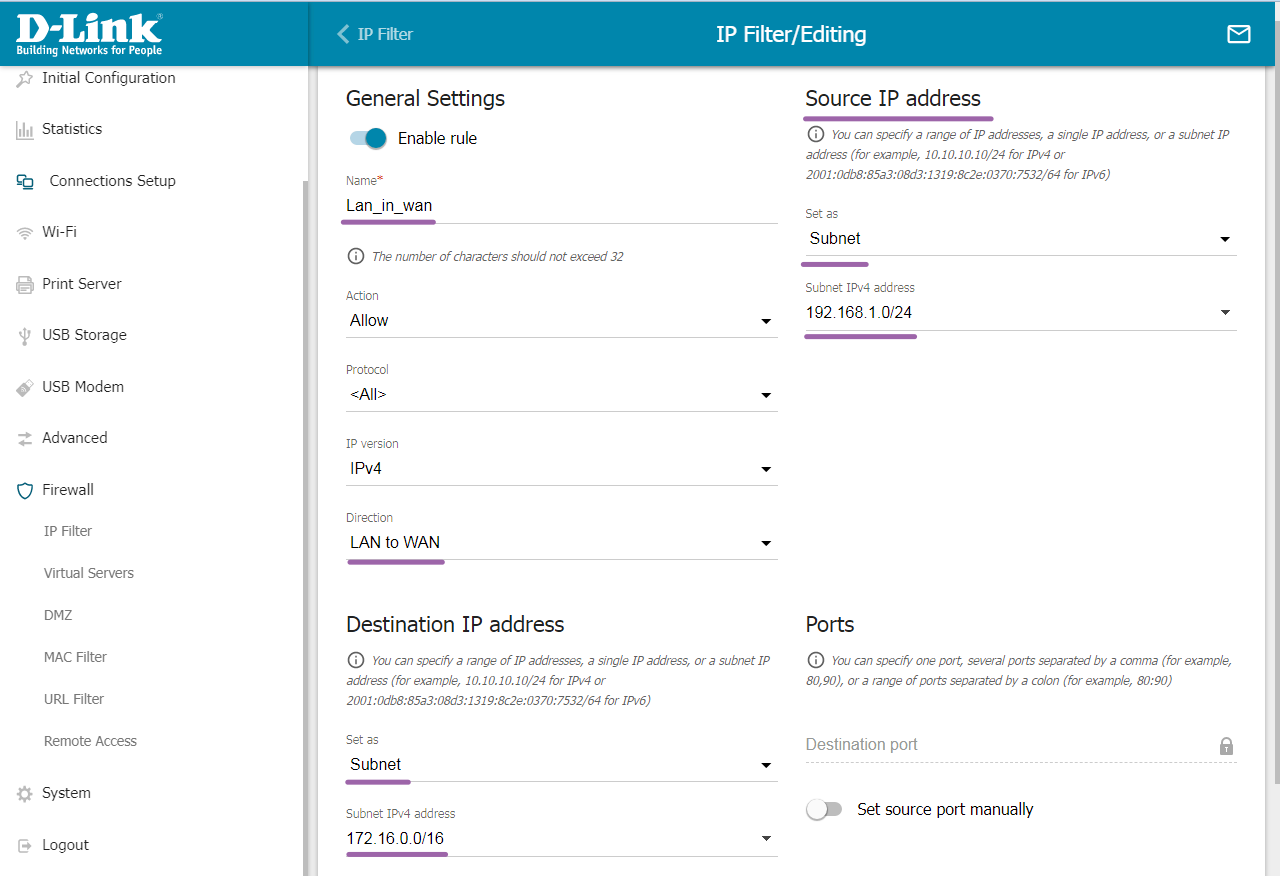
3.2 Firewall
Since I am currently configuring on DIR-300 (where I can afford not to enable the Network Filter and leave it turned off), I will skip this step, but I will provide screenshots of the settings (text explanation will be added later).
Firewall → IP Filters
The first rule:
The second rule:
4. Port Forwarding for Local Device to External Network
4.1 It is necessary to add routing and iptables rules each time a pppX connection (L2TP client connection to the server) is established.
At first, this may not be obvious, but connections sometimes break due to the absence of the Internet on the client, or because of server restarts, among other reasons.
I used a makeshift method by adding tasks to the file: /etc/ppp/ip-up (it's a working and tested method, but from a Linux Way perspective, it's a makeshift solution. I know, someday I will find the correct solution and write it here). Add the following line to the file /etc/ppp/ip-up:
sudo sh /etc/iptables.sh
And create the file /etc/iptables.sh with the following contents:
ip route add 192.168.1.0/24 via 172.16.0.1;
iptables -t nat -A PREROUTING -d 45.96.40.14 -p tcp --dport 580 -j DNAT --to-dest 192.168.1.36:80;
iptables -t nat -A POSTROUTING -d 192.168.1.36 -p tcp --dport 80 -j SNAT --to-source 172.16.0.1
Modify the highlighted parts according to your configuration:
- 45.96.40.14 – IP address of your VPS
- 192.168.1.36 – Local IP address of the device connected to the router (IP camera, DVR, web server, or any other device)
- 80 – Internal port of the local device (in my case, it's the web interface on port 80 for the IP camera)
- 580 – External port to which the local device is forwarded
Make the file executable:
sudo chmod +x /etc/iptables.sh
After this, you need to turn off and on the router so that the L2TP client disconnects from the server and reconnects (or simply press the Reconnect button, selecting the L2TP connection on the WAN Connections page in the D-Link router admin interface).
In the end: the web interface of the IP camera is accessible at the address 45.96.40.14:580 from any location on the Internet.
***
If you need to forward the ONVIF port 8080 for the IP camera externally, add the following 2 lines to the mentioned file /etc/iptables.sh:
iptables -t nat -A PREROUTING -d 45.96.40.14 -p tcp --dport 58080 -j DNAT --to-dest 192.168.1.36:8080;
iptables -t nat -A POSTROUTING -d 192.168.1.36 -p tcp --dport 8080 -j SNAT --to-source 172.16.0.1
If you need to add another port or another device, follow the same pattern and add 2 more lines accordingly.
***
***
The problem solved by this note is much simpler to address with port forwarding using a white IP (static IP).
This approach should be used only when a white IP is not available, for example, in scenarios like video surveillance at a country house where the internet is through a 4G modem.
***
And that's it. I will gradually update this note in the future.
P.S.: If something goes wrong, feel free to write on Telegram (username: first_Andres) - we'll figure it out.
***
Links on the topic:
***
You can also Google search for "vps vpn port forwarding."
Save it for yourself or share it with friends:


